Magnetometer Calibration
IMPORTANT: Features requiring a magnetometer are only available on device models with magnetometers. See Product Description to verify that your device has a magnetometer.
The following provides instructions for how to calibrate the 3DM-CV7's magnetometer using SensorConnect. Some of the information will also apply to those looking to implement a magnetometer calibration with custom software.
Why Calibrate?
Calibrating a magnetometer compensates for the magnetic (hard iron) and ferrous material (soft iron) present on the device that a 3DM-CV7 is mounted to. The local hard and soft iron effects distort readings of the earth's magnetic field and must be calibrated out in order for the 3DM-CV7 to generate accurate heading estimates.
IMPORTANT: During calibration, the 3DM-CV7 must be mounted to the device for which it is generating heading data, i.e. the drone, the robot, the tractor, etc.
IMPORTANT: Do not perform a calibration near large ferrous objects or strong magnets.
Basics
An ellipsoidal fit provides a better calibration than a spherical fit and should be used whenever possible. However, there are some applications where an ellipsoidal fit may not be possible because the device cannot be rotated enough during calibration to get good spatial coverage. An example would be calibrating a 3DM-CV7 mounted to a car as it drives on a flat parking lot. The quantity of spatial coverage can be determined with SensorConnect. More on this later.
When an ellipsoidal fit is not possible and a spherical fit must be used, it is highly recommended to specify the field strength of the earth's magnetic field in the application space. This can be determined through the World Magnetic Model (WMM). When an internet connection is available, SensorConnect can retrieve this data, or it can be entered manually.
Using SensorConnect
Step 1 - connect
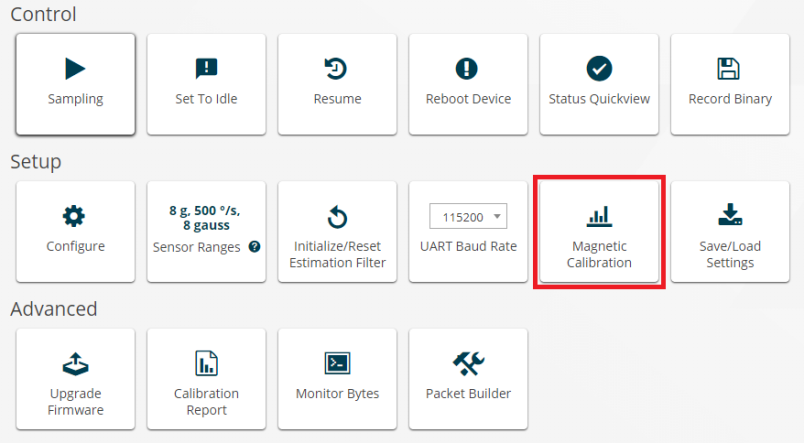
Open SensorConnect and connect to your 3DM-CV7. Select the tile highlighted in red.
Step 2 - collect data points
You will see the following panel in the Magnetic Calibration window.
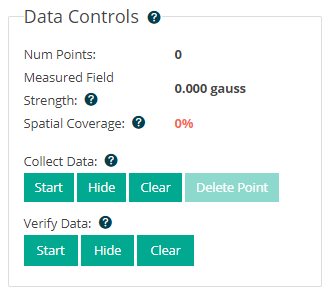
Press start under "Collect Data" and rotate the device on which the 3DM-CV7 is mounted. For best results, rotate the device in all three dimensions. You should see two things happen:
- The "Spatial Coverage" variable should increase. As it increases, the color will change from red to yellow, meaning enough coverage has been collected to perform a spherical fit, and eventually to green, when there is enough coverage to perform an ellipsoidal fit.
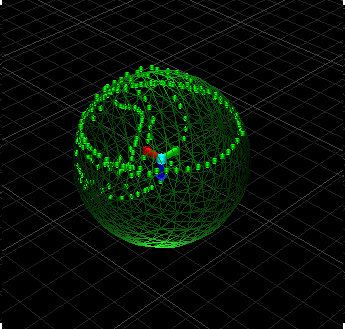
- A point cloud will populate a graphical display (shown below). The point cloud can guide a user to the regions missing data points so a user can increase the spatial coverage. The graphic is interactive and can be rotated using a mouse.
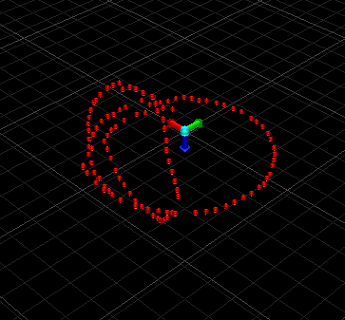
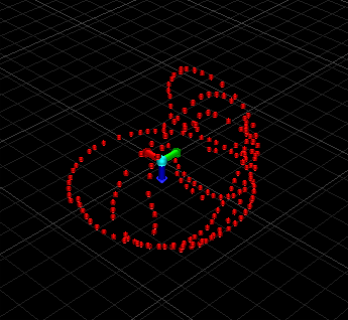
The image on the left shows an example of sufficient coverage for a spherical fit. The image on the right shows enough coverage for an ellipsoidal fit.
Once the coverage is sufficient for the application, press stop under "Collect Data".
Step 3 - choose fit
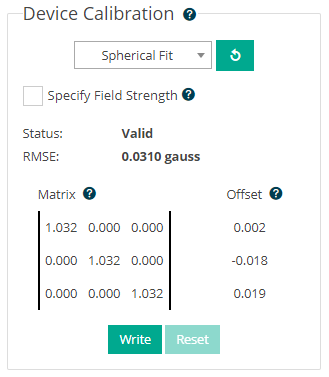
In the "Device Calibration" box, a user can select a spherical fit or an ellipsoidal fit from a drop-down menu. As mentioned previously, an ellipsoidal fit will produce the best calibration, but if you were unable to get enough spatial coverage for an ellipsoidal fit, use a spherical fit.
Too many outlier data points (outside of an imagined sphere or ellipsoid around the sensor) can result in a poor fit. Shown below. If this result occurs, redo step 2 being sure to constrain the motion of the sensor to rotation within a sphere.

To apply the calibration coefficients the user must press "Write". The calibration coefficients will be written to the non-volatile memory of the 3DM-CV7. These coefficients will not be erased between power cycles.
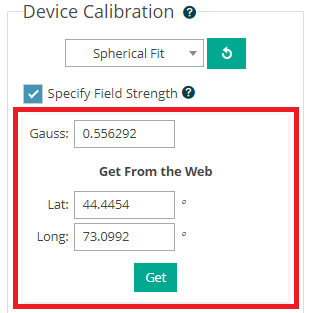
If using a spherical fit, it is highly recommended that, prior to writing the coefficients, the user specify the local magnetic field strength. This can be done by selecting the "Specify Field Strength" check box. The box highlighted in red will appear (see below).
A user can either manually enter the earth's magnetic field strength at their location in the box labeled "Gauss", or, if web access is available, the user can enter their latitude and longitude and press "Get". This will auto-populate the "Gauss" box with the field strength at their location as determined from the World's Magnetic Model (WMM).
Step 4 - verify data
This step is optional. When a user presses start the graphic displays the calibrated output as the user rotates the device the 3DM-CV7 is mounted to. A well-calibrated magnetometer will measure the same field strength for earth's magnetic field in every orientation; therefore, all the data points in the verification step should lie on the surface of a sphere. The radius of the sphere is the strength of the earth's magnetic field.